Toll-Free: 1-866-423-8525 I sales@clienttrackportal.com
Toll-Free: 1-866-423-8525 I sales@clienttrackportal.com
We've added many new features in Client Track Portal that you may not be aware of that can be beneficial for you and your firm. To make it easy for you, click any of the quick links below for more information on feature and how-to.
You can easily send secure emails requesting payments from your clients where the money automatically gets collected from the client and is deposited within your bank account in 7 days.
You must setup your payments (one-time) BEFORE sending secure payment emails
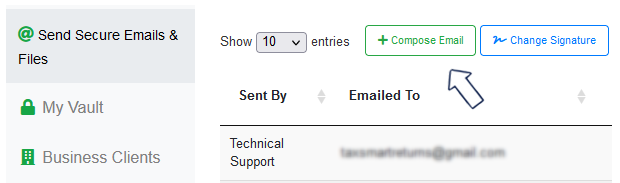
In Client Track Portal, go to 'Send Secure Emails & Files' on the left sidebar and click Compose Email
Step 2
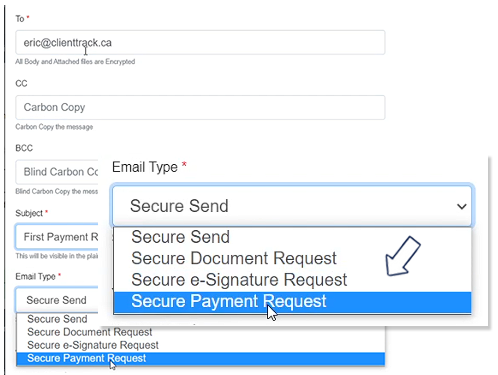
- Enter the recipient's email address (who you want to request payment from)
- Enter subject (i.e. Payment Request)
- For email type, select Secure Payment Request from the drop-down list
Step 3
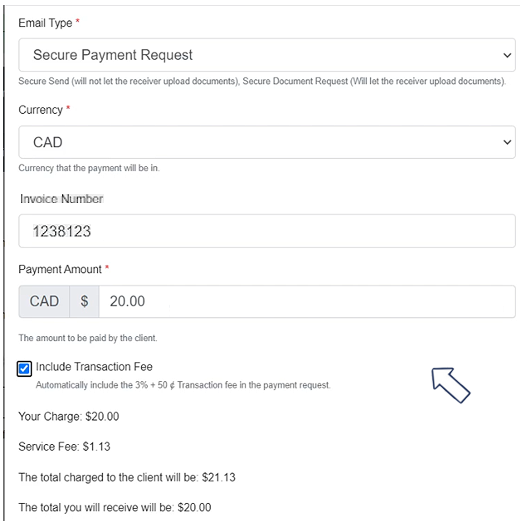
- By default, currency is set to CAD (Canadian).
- Enter your invoice number
- Enter the payment amount
- Check off Include Transaction Fee (optional)
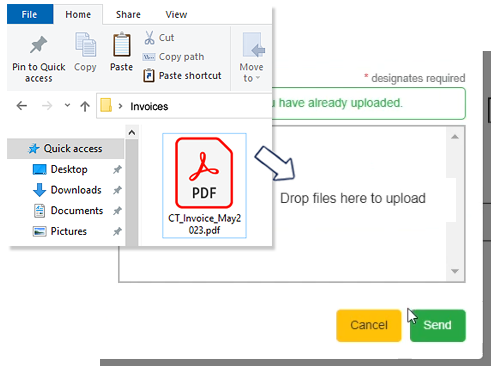
- Enter password, password hint and insert a message in the email body
Step 4
Drag 'n drop your invoice(s) into the white box area (or click inside and select the files to attach) and click Send to complete the payment request email.
You can view the sent emails on your dashboard in the 'Send Secure Emails & Files' section.
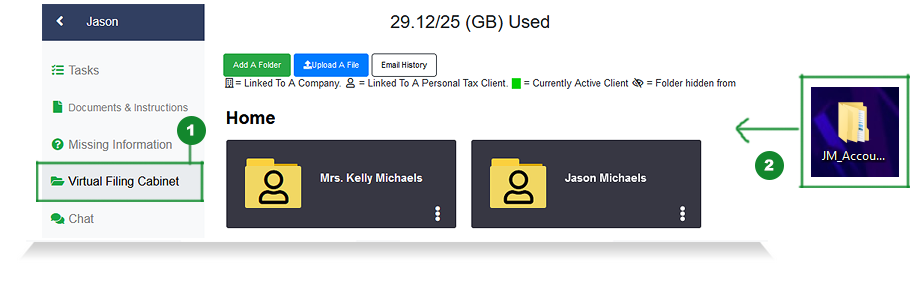
You can easily setup one default folder structure that will be replicated for all of your clients so you don't need to create repetitive folder structures for each of your clients' individually.
You can setup a default folder structure for your 'Business Clients' and a separate default folder structure for your 'Personal Tax Clients'
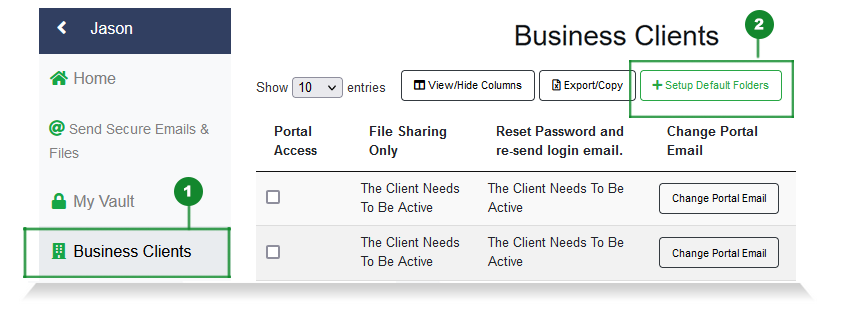
Step 1
In Client Track Portal, click on 'Business Clients' (1) from the left sidebar and then click 'Setup Default Folders' (2).
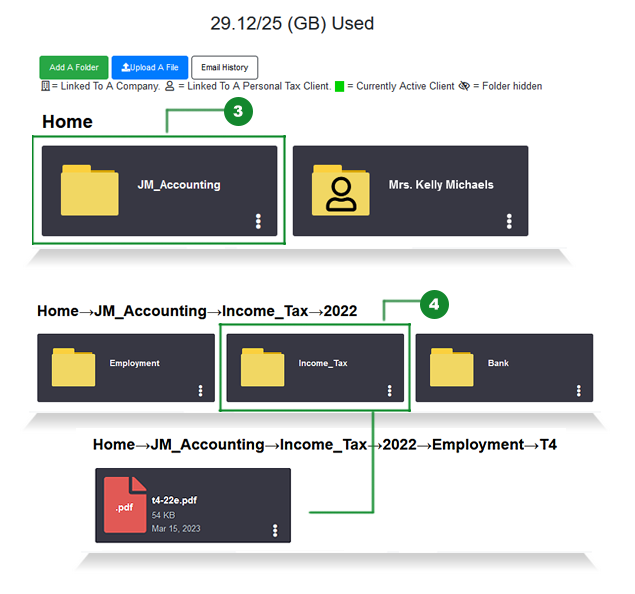
Step 2
In Setup Folder Structure window, click on 'Client Folder' to highlight it and then click 'Create' (3).
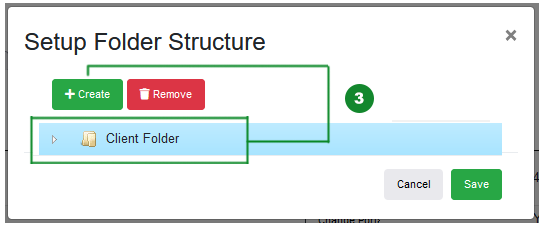

Step 3
Name folder and click 'Create' to add as many folders you want including subfolders (make sure you click on subfolder title to add folders within). When done, click 'Save' (4).
Step 4
Click 'Virtual Filing Cabinet' (5) from the left sidebar and open up the folders you've just created. (6)
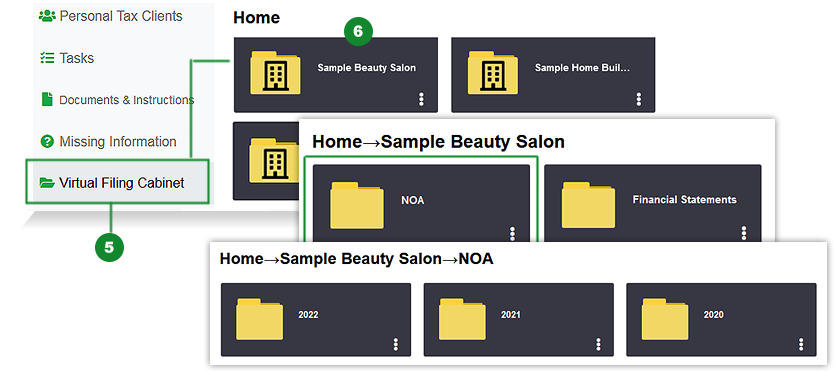
(You can follow the same steps above for 'Personal Tax Clients' section)
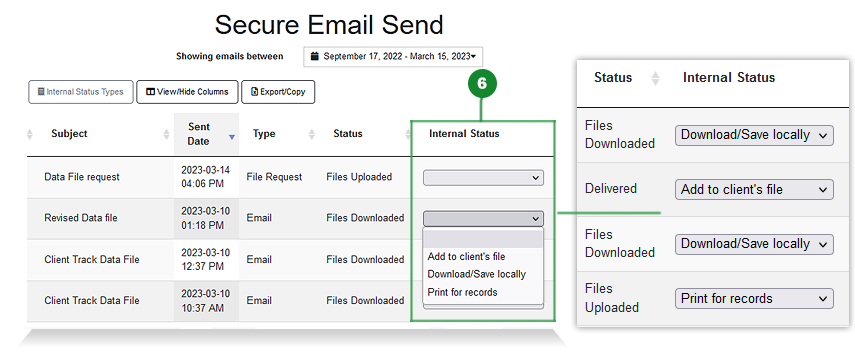
You can setup your own tracking status tags for each secure email in your secure inbox to track your own steps for each email. For example, to track whether you've saved the files locally, eFiled, completed the work, and/or responded to the client.
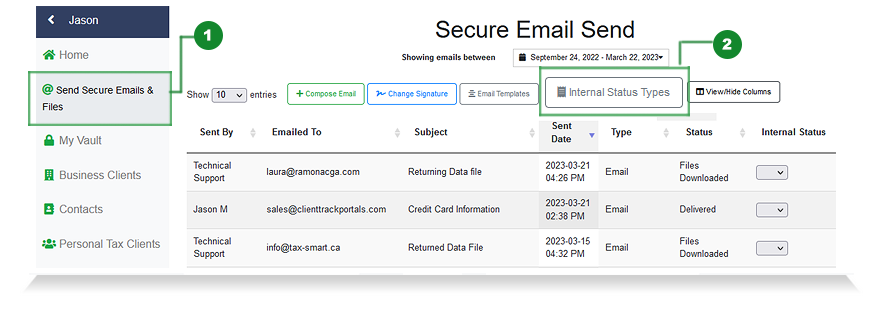
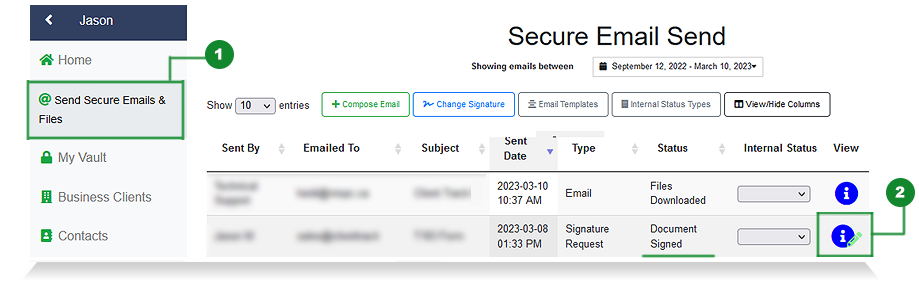
Step 1
In Client Track Portal, click on 'Send Secure Emails & Files' (1) from left sidebar and then click on 'Internal Status Types' (2).
Step 2
Click 'Add' (3), name title of status and then click 'OK' (4). Repeat process for multiple status types.

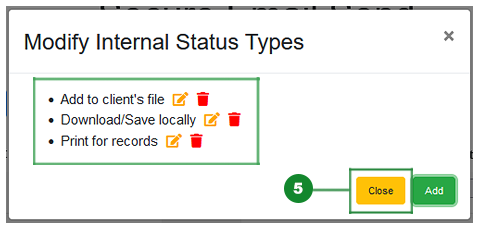
Step 3
You can edit or remove any of the internal status types you've added. When done, click 'Close' (5).
Step 4
Select the newly added status types under 'Internal Status' (6) column.
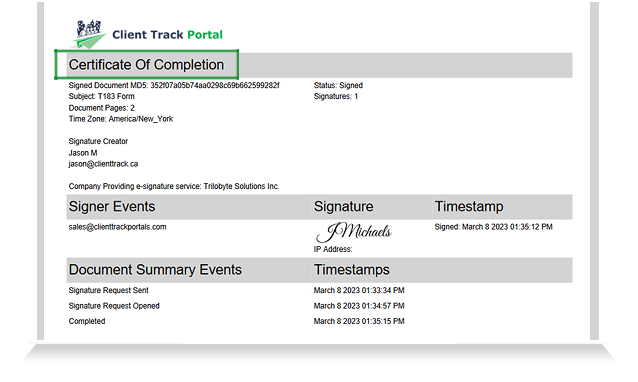
For security and assurance, we use certificate-based digital signatures for our secure e-Signature. Signed documents include a PDF copy of 'Certificate of Completion' that you can view and save for your records.
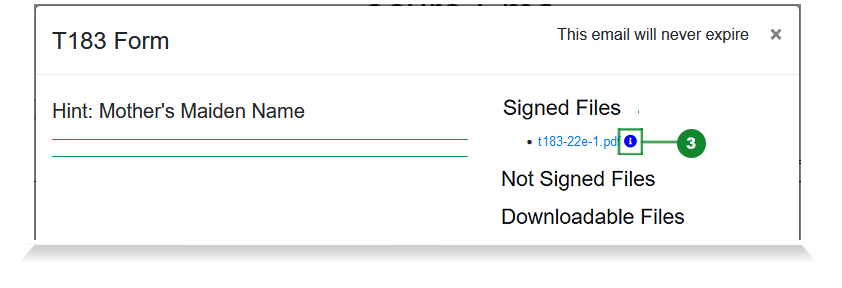
Step 1
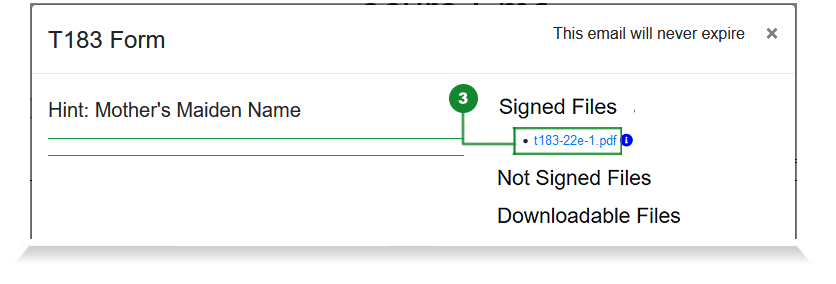
In Client Track Portal, click on 'Send Secure Emails & Files' (1) from the left sidebar and then click on the large information icon for document that has been signed (2). A pen icon notifies you that the document has been signed but you haven't downloaded it yet.
Step 2
Click the small information icon (3) beside signed PDF document to automatically download the digital PDF certificate.
(Optional: If you use Adobe Reader for opening PDF documents, you can also follow steps 4-6 below)
Step 3
View the digital certificate which includes details such as subject, creator/ signer email addresses, signature and timestamps.
Step 4
Click on the signed PDF document link (3) under 'Signed Files' to open up PDF in Adobe Reader
Step 5
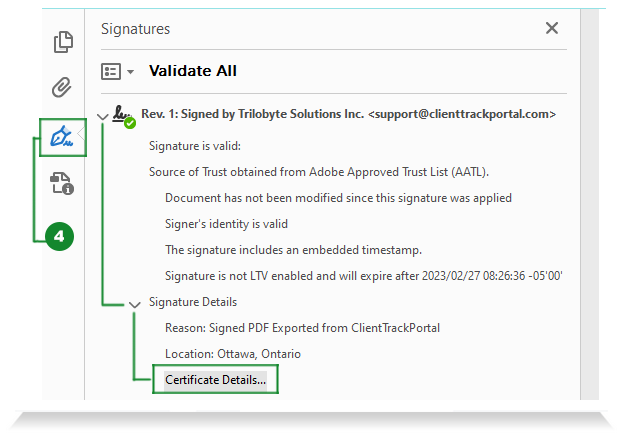
In Adobe Reader, click the pen icon (4) the left sidebar and then click the arrow beside Rev.1 - Signed by... and same for Signature Details. After you expanded the sub menus, click 'Certificate Details' near the bottom.
Step 6
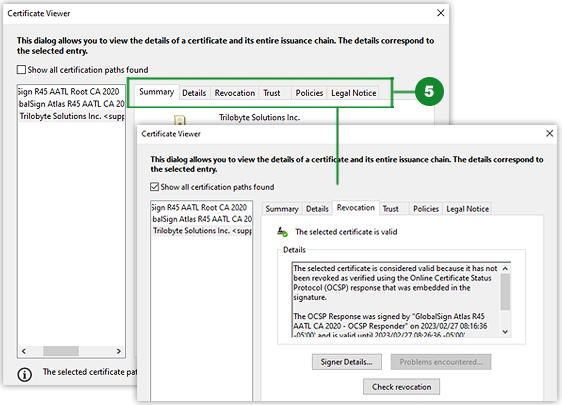
Browse through each tab for more information on the certificate (5).
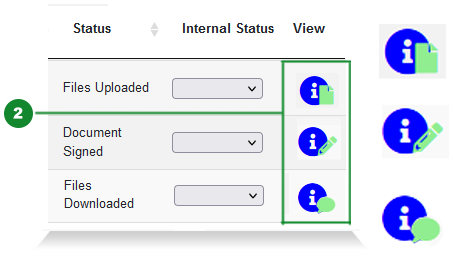
We have added more icon indicators to the 'info' icon for each email to show you important statuses at a glance, such as, whether you have viewed and downloaded the file or have received chats from the clients.
Step 1
In Client Track Portal, click on 'Send Secure Emails & Files' (1) from the left sidebar.

Step 2
A series of notification icons will appear when there is update on the type of email you've sent.
Paper icon = client has uploaded new requested files
The paper icon disappears once you have downloaded the files. This means you have an easy way of determining which files you have already viewed and downloaded, and which you have not.
Pen icon = client signed attached PDF document(s)
The pen icon disappears once you have downloaded the signed files. This means you have an easy way of determining which signed files you have already viewed and downloaded, and which you have not.
Chat icon = client replied to your secure email
The chat icon disappears once you viewed the chat message. This means you have an easy way of determining which chat messages you have already viewed, and which you have not.
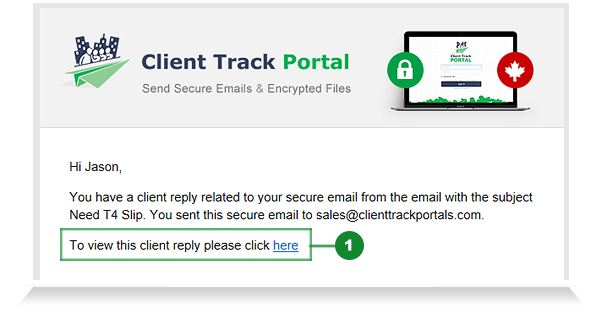
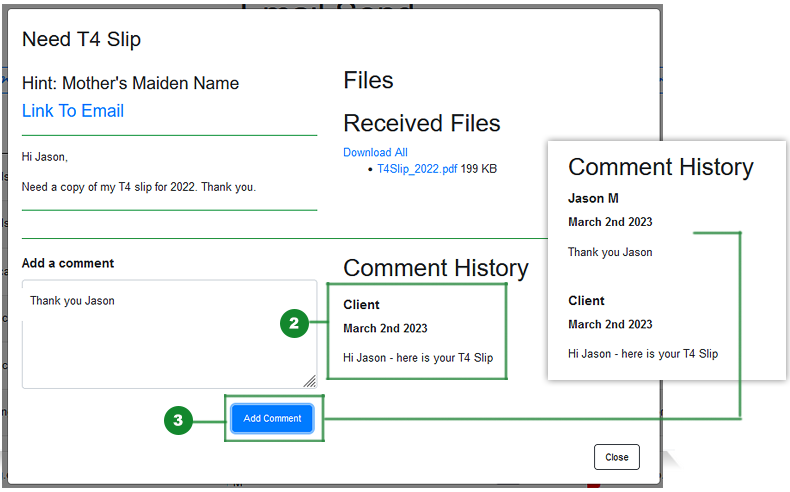
Clients and accountants can communicate back and forth on the same secure email.
Step 1
When a client has replied An email notification will be sent to the sender.
Step 2
View the replied comment (2), type in your reply and click 'Add Comment' (3).
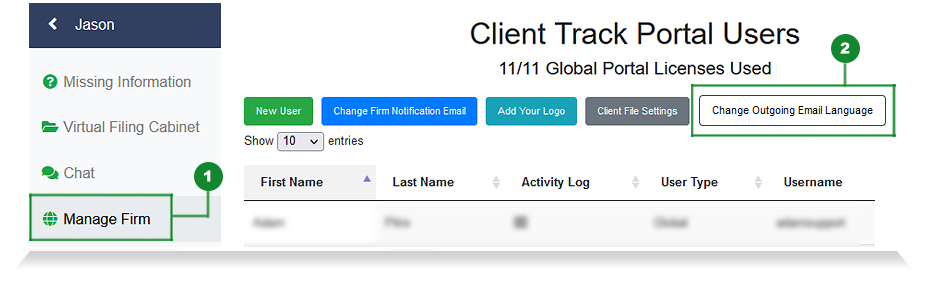
You can change the language for outgoing secure email notifications sent from Client Track Portal to your clients
Step 1
From the left sidebar, click on 'Manage Firm' (1) and then click on 'Change Outgoing Email Language' (2).
Step 2
Select a language of your choice from drop-down (3) and click 'Close' (4).
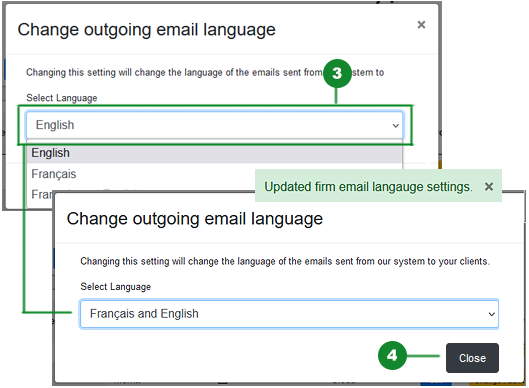
Step 3
The language has been updated for outgoing emails.
You can easily import your local folders into the Client Track Portal and we will replicate the whole folder structure, including all sub folders and the file contents within your Portal account.
Step 1
In Client Track Portal, click on 'Virtual Filing Cabinet' (1) from the left sidebar and drag 'n drop your folder inside the area.
Step 2
After folder has been processed and encrypted - double-click on the uploaded folder to verify all the files within.
(You can do the same for 'My Vault' section)
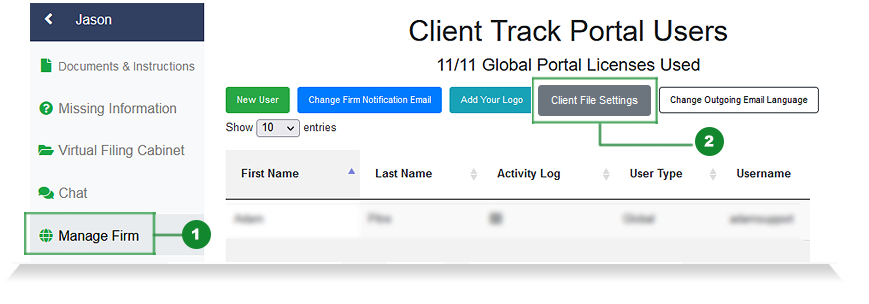
You can change the permissions for what your clients can do in terms of deleting or moving files within the portal, particularly with files that you upload.
Step 1
In Client Track Portal, click on 'Manage Firm' (1) from the left sidebar and then click on 'Client File Settings' (2).
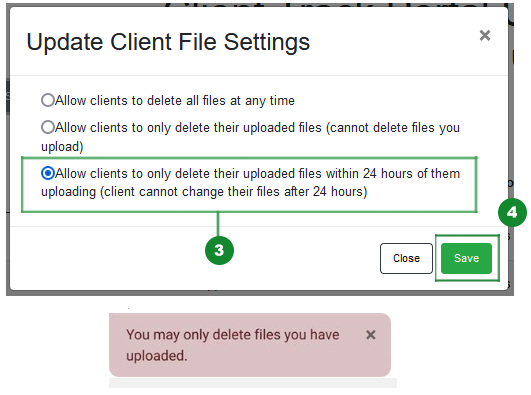
Step 2
For legal purposes, select the 3rd option (3) which doesn't allow clients to edit or delete their uploaded files to you after 24 hours. When done, click 'Save' (4).
If a client tries to delete their uploaded files after 24 hours, a pop-up will notify them that they can't.
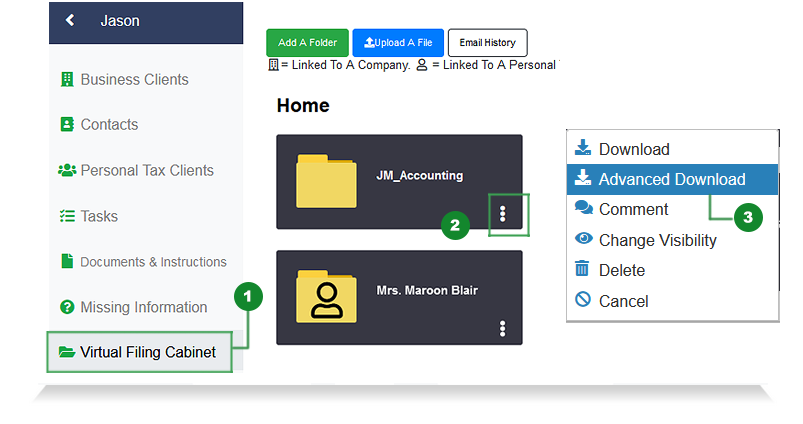
Folders in the 'Virtual Filing Cabinet' and 'My Vault' (including all contents within) can be downloaded as a ZIP file.
Step 1
In Client Track Portal, click on 'Virtual Filing Cabinet' (1) from the left sidebar. Click on the 3 dots icon on a folder (2) and select 'Advanced Download' (3).
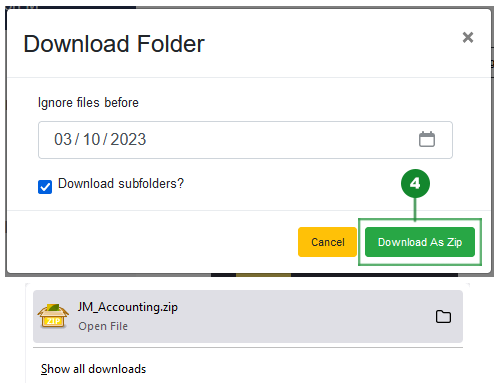
Step 2
Select date to not include files before (optional) and check off 'Download subfolders'. When done, click 'Download As ZIP' (4). Open up the ZIP file to verify all the files within.
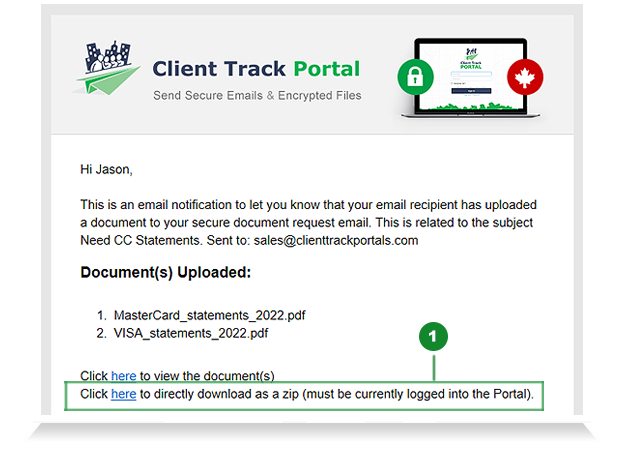
Uploaded files can be downloaded directly from the secure email notification as a ZIP file.
Step 1
Log into your Portal account and then open up the email notification. Click the link near the bottom of the email to directly download the files as a ZIP file (1).
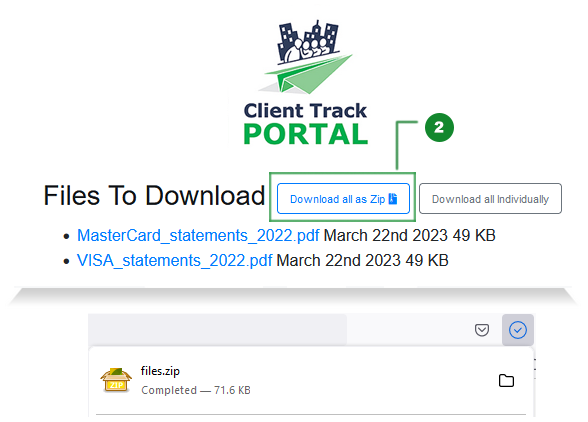
Step 2
Click 'Download All As ZIP' (2) to automatically download all the attached PDF documents. To download PDF documents seperately instead of a ZIP file, click 'Download all individually'.
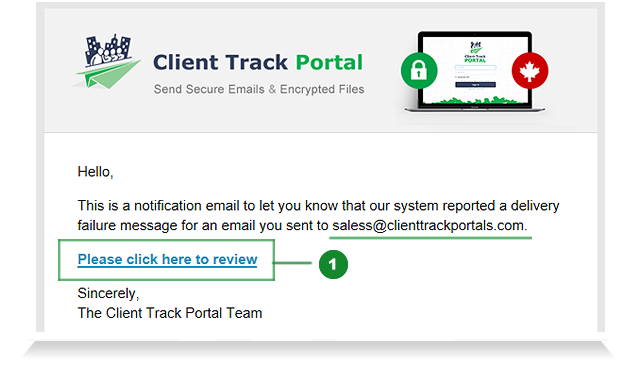
If an email fails to send for some reason, Client Track Portal will send a failed delivery email notification to the sender.
Step 1
Log into your Portal account and open up the email delivery failed notification. Click 'Please click here to review' (1) link in the email
Step 2
In Client Track Portal, click on 'Send Secure Emails & Files' (2) from the left sidebar. Find the failed sent email and click the trash icon (3) to delete email. If the cause was due to wrong email address, create a new email with correct email address to send again.

1-866-423-8525
................................................................